DIY Hooded Poncho Jacket
- Paige Winfree
- Sep 1, 2016
- 4 min read

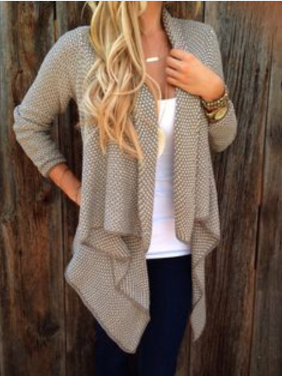
Last fall I was absolutely in love with the handkerchief-front cardigans. They were so comfortable to wear, almost like you were wearing a cardigan and a blanket combined!
I loved the style so much that I decided to make a heavier-weight version. I wanted to create something similar in style that I could wear as an outer layer during the fall (heavier than a cardigan).
Since I am in love with DIY projects, I figured I could give this a shot.
I started off researching the construction of these handkerchief-front cardigans. I needed to find a way to replicate the handkerchief effect. Here is a gallery of images I used for inspiration. *I do not own any of these images*
I decided to save myself some time and construct this hooded poncho jacket out of an existing cotton zip-front hoodie, and some soft poncho-like fabric.
Off I went to scour my local craft store looking for the perfect poncho fabric. They had this nice western-feeling fabric that I landed on.

Next, I scoured the thrift stores looking for a zip-up hooded sweatshirt. I took my poncho fabric with me to make sure the hooded sweatshirt and the poncho fabric coordinated.

I got my zip-up hooded sweatshirt home and got to work creating a pattern for my hooded poncho. Using a seam ripper, I removed the sleeves of the zip-up hoodie and laid them aside. These later will become the sleeves I use for my DIY hooded poncho jacket.

I took the remaining piece of the zip-up hoodie (now just a vest with a hood), and laid it on top of my poncho fabric. I folded down the hood so that it would not get in the way of the vest-shape pattern. I traced out the shape of the vest onto my poncho fabric. This piece becomes the back of the poncho jacket.


Next come the 2 pieces for the front of the poncho jacket. From my research, I discovered that the handkerchief front of the cardigans was created by lengthening the front pieces of the cardigan (the pieces that typically get buttoned in the front). In order to create these pieces, I made sure I had plenty of poncho fabric laid out so that I could trace each jacket front piece with an additional 6-inch rectangle added to where the zipper sat. Unfortunately, I did not get any pictures of this piece before it was cut out. But hopefully from the after picture, you get the idea.

I took the front pieces and back piece of the poncho fabric and hemmed all sides except for the one that would not go into a seam (this is the piece that would face out and hang handkerchief style). It was fine to leave that one un-hemmed, since this part ended up being the edge of the fabric, which wasn’t really fraying at all, and I liked how the unfinished edge looked. Feel free to hem the front edge of your poncho if you like. I would recommend waiting to hem along the bottom edges of each piece of fabric (the edge that will be hanging along your hips) until you have completed the next step (attaching the front and back pieces). Since I hemmed the bottom edges before the pieces were attached, I ended up with an uneven bottom hem.


Once I had completed hemming around the edges of the two front and one back piece of fabric, I pinned the pieces together and sewed along the seam. Make sure you are sewing with the yucky side of the fabric facing out, so that when you turn the vest, the seams are on the inside, and the pretty side of the fabric is facing out.

Next you will want to hem the bottom of the poncho vest piece. Make sure you hem this to the inside. I tried hemming each piece individually before attaching them together, and I learned that was the wrong order to do things (notice that the hemmed edges don’t match up). Don’t replicate my mistake. Save the hemming for after you have attached the front and back poncho pieces, that way you have a clean hem the whole way around.
Next you will attach the sleeves from the zip-front hoodie. Again, make sure you attach these correctly so that after sewing and turning the garment right side out, the seam is inside, and the correct sides of the fabric are facing out.


When I made this originally, I wasn’t sure I wanted a hood. But after starting it, I decided I did want the hood. So I used a seam ripper to remove the hood from the zip-front hoodie at this point in the process. However, you can feel free to remove the hood when you remove the sleeves, that way you get all your seam ripping done at once. After removing the hood from the hoodie, I pinned it to the jacket. Not to run this into the ground, but please make sure you attach the hood so that when you are wearing it, the seam is hidden inside.


Turn your poncho right side out, and you are good to go!

Time to go get a friend or significant other to take some photos of you in your new hooded poncho jacket! Please share any photos you do take, I would love to see your end result!


Comments